
[DL/CV/PRJ] Sequential이 아닌 Functional API로 모델 만들기
Sequential이 아닌 Functional API를 사용하면 중간에 중간에 레이어를 다양하게 변형하고 합쳐주는 등 다양한 형태의 모델을 만들 수 있다.
| 의류 이미지 구분 DL 프로젝트 |
본 포스팅은 본 블로그에서 기존에 진행했던 [DL] Image Classification DL 모델 만들기 1 프로젝트의 코드를 Funtional API 방식으로 변형하여 작성하였다.
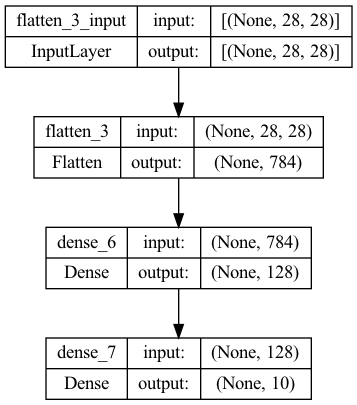
1. Plot model
모델을 시각화하기 위해서는 Tensorflow의 plot_model을 사용해야하는데 이를 위해서는 사전에 pydot과 GraphViz가 설치되어 있어야 한다.
1) pydot 설치
$ pip install pydot
2) GraphViz 설치
$ brew install graphviz
3) 모델 시각화하기
from tensorflow.keras.utils import plot_model


plot_model(model, to_file='model.png', show_shapes=True, show_layer_names=True)
위 코드를 통해 내가 구성한 모델을 그림으로 확인해볼 수 있다.
Example)
import tensorflow as tf
from tensorflow.keras.utils import plot_model


(trainX, trainY), (testX, testY) = tf.keras.datasets.fashion_mnist.load_data()

trainX = trainX / 255.0
testX = testX / 255.0

trainX = trainX.reshape( (trainX.shape[0], 28,28,1) )
testX = testX.reshape( (testX.shape[0], 28,28,1) )

model = tf.keras.Sequential([
    tf.keras.layers.Flatten(input_shape=(28,28)),
    tf.keras.layers.Dense(128, activation='relu'),
    tf.keras.layers.Dense(10, activation='softmax'),
])

plot_model(model, to_file='model.png', show_shapes=True, show_layer_names=True)
2. Functional API 이용해 모델 만들기 & 시각화
import tensorflow as tf
from tensorflow.keras.utils import plot_model

input1 = tf.keras.layers.Input(shape=[28,28])
flatten1 = tf.keras.layers.Flatten()(input1) # Input -> Flatten
dense1 = tf.keras.layers.Dense(28*28, activation='relu')(flatten1) # Input -> Flatten -> Dense
reshape1 = tf.keras.layers.Reshape((28,28))(dense1) # Input -> Flatten -> Dense -> Reshape

concat1 = tf.keras.layers.Concatenate()([input1, reshape1])
flatten2 = tf.keras.layers.Flatten()(concat1)
output = tf.keras.layers.Dense(10, activation='softmax')(flatten2)

model = tf.keras.Model(input1, output) # 모델의 시작과 끝

model.compile(optimizer='adam', loss='sparse_categorical_crossentropy', metrics=['accuracy'])

plot_model(model, to_file='model.png', show_shapes=True, show_layer_names=True)

model.fit(trainX, trainY, validation_data=(testX, testY), epochs=3)

- 레이어를 만들고 변수에 할당해준다.
- 다음 레이어의 마지막에 전 레이어를 연결해준다. (소괄호 이용)
tf.keras.Model(input 레이어 변수명, output 레이어 변수명): 모델의 마지막에 마무리로모델의 시작과 끝을 알려줘야 한다.Reshape(): 기존의 행렬을 다른 차원으로 변경해준다. Ex) [1 2 3 4 5 6] → [[1 2 3] [4 5 6]]Concatenate()([input1, reshape1]): input1, reshape1 레이어를 합쳐준다.- 참고) 위 모델의 디자인 의도: 데이터를 Conv2D, Pooling 등 변형을 너무 많이 하면 원본 데이터에 대한 정보가 많이 손실될 수 있다. 그래서 첫 레이어를 복사해서 중간에 합쳐줬다. 이로써 모델이 원본데이터의 정보를 잘 활용할 수 있도록 하였다.

Leave a comment